1. 前言
自从马斯克接手了 Twitter ,许多的境外网友就马不停蹄地寻找各种社交平台,去中心化的社交也因此为众人所熟知,越来越多的人了解去中心化社交(小俊算是其中一个,去中心化社交也深受大众的喜爱!今天小俊就给大家介绍一款可以自行部署的去中心化社交媒体服务器—— Firefish .
1.1 官方网站
官方网站: https://joinfirefish.org
官方GitLab: https://git.joinfirefish.org/firefish/firefish
2. Firefish 简介
2.1 简介
🌎 Firefish is an open source, decentralized social media platform that’s free forever! 🚀Firefish is based off of Misskey, a powerful microblogging server on ActivityPub with features such as emoji reactions, a customizable web UI, rich chatting, and much more!Firefish adds many quality of life changes and bug fixes for users and server admins alike.
🌎 Firefish 是一个开源、去中心化的社交媒体平台,永远免费!🚀Firefish 基于 Misskey,Misskey 是 ActivityPub 上强大的微博服务器,具有表情符号反应、可自定义的 Web UI、丰富的聊天等功能!Firefish 为用户和服务器管理员增加了许多生活质量更改和错误修复。
2.2 与Misskey的显著差异


3. 准备工作
- 【必需】一台服务器(推荐 腾讯云轻量应用服务器 HK 或境内,其他服务器(如 CloudCone 、 RackNerd 、家里云或者各家企业的私有云亦可
- 【建议】操作系统: Debian 12 ,腾讯云轻量应用服务器推荐 Debian12-Docker24
- 【建议且必需】域名一枚,并解析到服务器上
- 【可选建议使用反向代理本教程选用NPM】安装好Nginx Proxy Manager( 相关教程 )
注意
{alert type=”info”}
这是一篇全新安装教程,若你的服务器已有环境或者已有数据请谨慎重装系统!!!可直接跳至6.2 环境准备(其他服务器) 继续阅读。
这是一篇全新安装教程,若你的服务器已有环境或者已有数据请谨慎重装系统!!!可直接跳至6.2 环境准备(其他服务器) 继续阅读。
这是一篇全新安装教程,若你的服务器已有环境或者已有数据请谨慎重装系统!!!可直接跳至 6.2 环境准备(其他服务器) 继续阅读。
{/alert}
本文软件基于腾讯云轻量应用服务器安装,建议配置如上说明,教程使用的腾讯云轻量应用服务器系统为 Debian 12 !理论上腾讯云轻量应用服务器为 Debian 12 的服务器操作应与本文基本一致(包括过程与报错),其他系统为 Debian 或者 Ubuntu 的服务器应与本文大同小异!
腾讯云轻量应用服务器购买地址: https://curl.qcloud.com/XqKjWCYA
腾讯云开年上云有礼: https://curl.qcloud.com/ujD237Hl
腾讯云云产品特惠专区: https://curl.qcloud.com/TPJfrddE
腾讯云游戏服专属特惠: https://curl.qcloud.com/RuF9ibni
4. 视频教程
5. 界面演示
5.1 未登录首页

5.2 注册弹窗

5.3 登录弹窗

5.4 时间线页

5.5 个人资料页

5.6 发现页

5.7 搜索页

5.8 搜索结果页

5.9 聊天页

5.10 聊天页-群组页

5.11 设置页

6. 部署 Firefish
6.1 环境准备(腾讯云轻量应用服务器)
该步骤特别为使用腾讯云轻量应用服务器的用户准备,若你不是用腾讯云轻量应用服务器部署该程序,可以直接转到 6.2 环境准备(其他服务器) 继续阅读。
6.1.1 重装系统
{alert type=”error”}
此操作前请确保服务器上无重要程序、文件!!!请确保服务器上的数据已经备份好!!!
此操作前请确保服务器上无重要程序、文件!!!请确保服务器上的数据已经备份好!!!
此操作前请确保服务器上无重要程序、文件!!!请确保服务器上的数据已经备份好!!!
{/alert}
进入腾讯云轻量应用服务器的控制台,进入 重装系统 界面,然后选择 使用容器镜像 ,列表中选择 Debian12-Docker24 请确保服务器上无重要程序、文件!!!请确保服务器上的数据已经备份好!!! 然后点击勾选 确认已了解以上内容,我确定已备份完成 ,而后点击确定即可完成系统重装。

腾讯云轻量应用服务器这边我们直接选择 Docker 容器镜像,就可以跳过安装 Docker 的步骤(如果你使用的是境内服务器,腾讯云的 Docker 容器镜像已经配置好了国内镜像源,可以加速访问 Docker 镜像资源)。
6.1.2 登录服务器
OrcaTerm (原名 WebShell )是腾讯遨驰云原生操作系统中 CVM 、 Lighthouse、裸金属等产品的统一网页终端,帮助用户随时随地通过浏览器远程登录服务器管理业务,相比本地远程终端更轻量便捷,无需掌握 SSH 和 FTP 也可轻松操作。
进入腾讯云轻量应用服务器的控制台,点击右上方的 登录 ,使用腾讯云正在公测的 OrcaTerm 登录到服务器。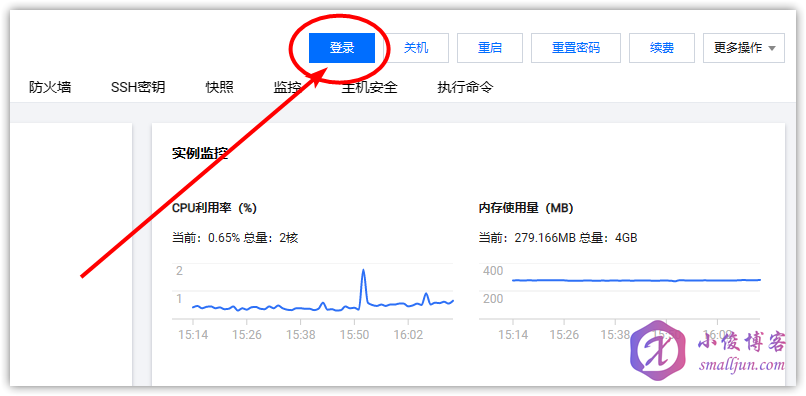
然后点击登录,即可登录到服务器中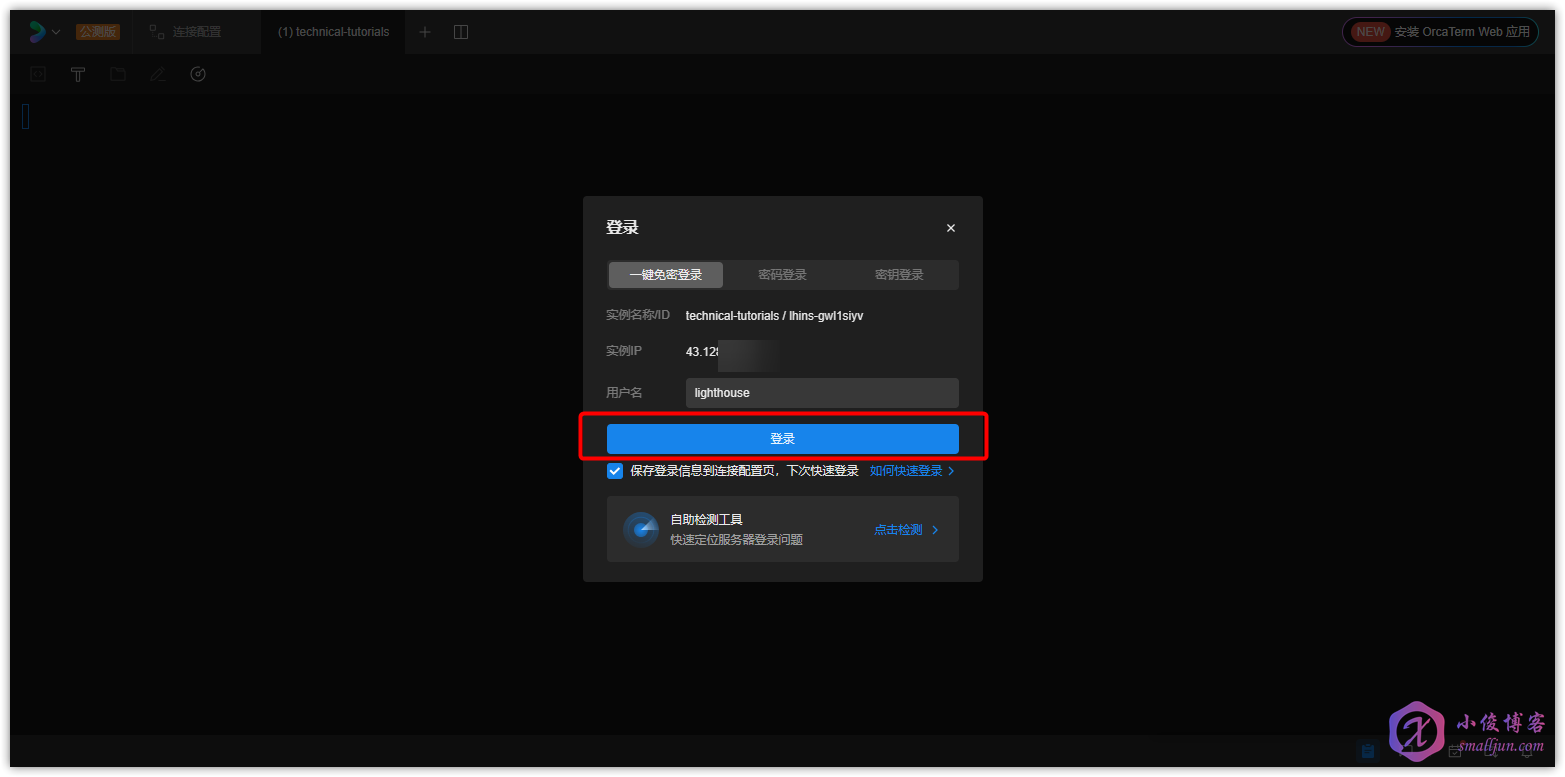
输入下面这句命令登录到 root 账号
sudo -i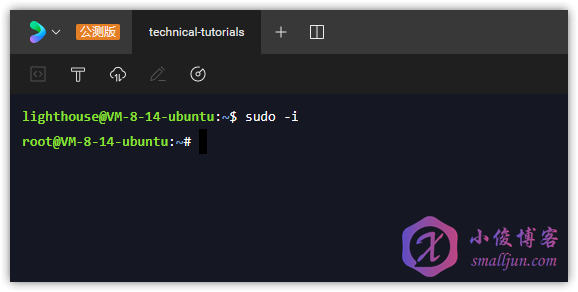
6.1.3 安装 Nginx Proxy Manager(可选建议使用反向代理本教程选用NPM)
安装 Nginx Proxy Manager 的详细教程小俊之前也写过哦,也配有详细的视频版本,需要学习的朋友可以点击这篇文章学习👉👉👉链接:【教程】使用腾讯云轻量应用服务器搭建Nginx Proxy Manager,优美简单地解决反向代理!https://www.smalljun.com/archives/3113.html ,当然想要使用反向代理的小伙伴要是熟悉 Nginx ,也可以自己手搓Nginx进行反向代理哦!你想用宝塔面板的话,也是没有问题哒!
6.2 环境准备(其他服务器)
该步骤为各种服务器的环境准备通法,若你使用腾讯云轻量应用服务器部署该程序并已经仔细阅读 6.1 环境准备(腾讯云轻量应用服务器) 并按步骤完成操作,可以跳过该步骤,直接转到 6.3 部署 Firefish 继续阅读。
6.2.1 更新 Packages 并安装必要软件包
执行以下命令,更新 Packages 并安装必要软件包
apt -y update
apt -y install curl
6.2.2 安装并启动 Docker
6.2.2.1 境外服务器安装 Docker
执行以下命令,境外服务器安装 Docker
curl -fsSL https://get.docker.com | bash -s docker6.2.2.2 境内服务器安装 Docker
执行以下命令,境内服务器使用阿里云镜像源安装 Docker
curl -fsSL https://get.docker.com | bash -s docker --mirror Aliyun执行以下命令,境内服务器使用国内 daocloud 一键安装命令安装 Docker
curl -sSL https://get.daocloud.io/docker | sh6.2.2.3 启动 Docker
输入并执行以下命令,启动Docker
systemctl start docker再执行以下命令,查看Docker的运行状态
systemctl status docker最后执行以下命令,设置Docker开机自启动
systemctl enable docker
由于我们通过以上一键脚本安装的Docker为最新版本,新版本的Docker自带compose这个子命令,所以我们无需额外安装docker-compose。下文中若你见到docker-compose命令,请你使用使用 docker compose 命令!
使用方面仅有一个 – (dash)字符只差, 新版 使用 docker compose 命令,而如果你是 旧版 就使用 docker-compose 命令。
6.2.3 安装 Nginx Proxy Manager(建议使用反向代理本教程选用NPM)
安装 Nginx Proxy Manager 的详细教程小俊之前也写过哦,也配有详细的视频版本,需要学习的朋友可以点击这篇文章学习👉👉👉链接:【教程】使用腾讯云轻量应用服务器搭建Nginx Proxy Manager,优美简单地解决反向代理!https://www.smalljun.com/archives/3113.html ,当然想要使用反向代理的小伙伴要是熟悉Nginx,也可以自己安装Nginx进行反向代理哦!你想用宝塔面板的话,也是没有问题哒!
6.3 部署 Firefish
{alert type=”info”}
该教程连带安装meilisearch搜索引擎,如不需要请自行删除相关安装内容!
该教程连带安装meilisearch搜索引擎,如不需要请自行删除相关安装内容!
该教程连带安装meilisearch搜索引擎,如不需要请自行删除相关安装内容!
{/alert}
6.3.1 新建目录
执行以下命令,新建目录
mkdir -p /opt/docker/firefish/config && cd /opt/docker/firefish/config
6.3.2 新建配置文件
执行以下命令,输入
nano default.yml新建配置文件,编辑配置文件,以下是参照发文时官方的配置文件示例做出注释及修改,大家可以参考下方对配置文件做出修改,然后 Ctrl X + y +回车 退出并保存即可。
#━━━━━━━━━━━━━━━━━━━━━━━━━━━━━━━━━━━━━━━━━━━━━━━━━━━━━━━━━━━━━━━
# Firefish configuration
#━━━━━━━━━━━━━━━━━━━━━━━━━━━━━━━━━━━━━━━━━━━━━━━━━━━━━━━━━━━━━━━

# After starting your server, please don't change the URL! Doing so will break federation.

#   ┌─────┐
#───┘ URL └─────────────────────────────────────────────────────

# Final accessible URL seen by a user.
url: https://example.com/ //配置Firefish域名

#   ┌───────────────────────┐
#───┘ Port and TLS settings └───────────────────────────────────

#
# Firefish requires a reverse proxy to support HTTPS connections.
#
#                 +----- https://example.com/ ------------+
#   +------+      |+-------------+      +----------------+|
#   | User | ---> || Proxy (443) | ---> | Firefish (3000) ||
#   +------+      |+-------------+      +----------------+|
#                 +---------------------------------------+
#
#   You need to set up a reverse proxy. (e.g. nginx, caddy)
#   An encrypted connection with HTTPS is highly recommended
#   because tokens may be transferred in GET requests.

# The port that your Firefish server should listen on.
port: 2087

# The bind host your Firefish server should listen on.
# If unspecified, the wildcard address will be used.
#bind: 127.0.0.1

#   ┌──────────────────────────┐
#───┘ PostgreSQL configuration └────────────────────────────────

db:
  host: firefish_db // host对应docker-compose文件内的services名
  port: 5432
  #ssl: false
  # Database name
  db: firefish // 应设置为docker-compose文件内POSTGRES_DB变量的值

  # Auth
  user: smalljunsetyourdbusername // 应设置为docker-compose文件内POSTGRES_USER变量的值
  pass: smalljunsetyourdbpassword // 应设置为docker-compose文件内POSTGRES_PASSWORD变量的值

  # Whether disable Caching queries
  #disableCache: true

  # Extra Connection options
  #extra:
  #  ssl:
  #   host: localhost
  #   rejectUnauthorized: false

#   ┌─────────────────────┐
#───┘ Redis configuration └─────────────────────────────────────

redis:
  host: firefish_redis // host对应docker-compose内的容器名
  port: 6379
  #tls:
  #  host: localhost
  #  rejectUnauthorized: false
  #family: 0  # 0=Both, 4=IPv4, 6=IPv6
  #pass: example-pass
  #prefix: example-prefix
  #db: 1
  #user: default

#   ┌─────────────────────────────┐
#───┘ Cache server configuration └─────────────────────────────────────

# A Redis-compatible server (DragonflyDB, Keydb, Redis) for caching
# If left blank, it will use the Redis server from above

#cacheServer:
  #host: localhost
  #port: 6379
  #family: 0  # 0=Both, 4=IPv4, 6=IPv6
  #pass: example-pass
  #prefix: example-prefix
  #db: 1

# Please configure either MeiliSearch *or* Sonic.
# If both MeiliSearch and Sonic configurations are present, MeiliSearch will take precedence.

#   ┌───────────────────────────┐
#───┘ MeiliSearch configuration └─────────────────────────────────────
meilisearch:
  host: firefish_meilisearch
  port: 7700
  ssl: false
  apiKey: smalljunsetyourapikey // 应设置为docker-compose文件内MEILI_MASTER_KEY变量的值

#   ┌─────────────────────┐
#───┘ Sonic configuration └─────────────────────────────────────

#sonic:
#  host: localhost
#  port: 1491
#  auth: SecretPassword
#  collection: notes
#  bucket: default


#   ┌───────────────┐
#───┘ ID generation └───────────────────────────────────────────

# No need to uncomment in most cases, but you may want to change
# these settings if you plan to run a large and/or distributed server.

# cuid:
#   # Min 16, Max 24
#   length: 16
#
#   # Set this to a unique string across workers (e.g., machine's hostname)
#   # if your workers are running in multiple hosts.
#   fingerprint: my-fingerprint


#   ┌─────────────────────┐
#───┘ Other configuration └─────────────────────────────────────

# Maximum length of a post (default 3000, max 100000)
#maxNoteLength: 3000

# Maximum length of an image caption (default 1500, max 8192)
#maxCaptionLength: 1500

# Reserved usernames that only the administrator can register with
reservedUsernames: [
  'root',
  'admin',
  'administrator',
  'me',
  'system'
]

# Whether disable HSTS
#disableHsts: true

# Number of worker processes by type.
# The sum must not exceed the number of available cores.
#clusterLimits:
#  web: 1
#  queue: 1

# Job concurrency per worker
# deliverJobConcurrency: 128
# inboxJobConcurrency: 16

# Job rate limiter
# deliverJobPerSec: 128
# inboxJobPerSec: 16

# Job attempts
# deliverJobMaxAttempts: 12
# inboxJobMaxAttempts: 8

# Local address used for outgoing requests
#outgoingAddress: 127.0.0.1

# IP address family used for outgoing request (ipv4, ipv6 or dual)
#outgoingAddressFamily: ipv4

# Syslog option
#syslog:
#  host: localhost
#  port: 514

# Proxy for HTTP/HTTPS
#proxy: http://127.0.0.1:3128

#proxyBypassHosts: [
#  'web.kaiteki.app',
#  'example.com',
#  '192.0.2.8'
#]

# Proxy for SMTP/SMTPS
#proxySmtp: http://127.0.0.1:3128   # use HTTP/1.1 CONNECT
#proxySmtp: socks4://127.0.0.1:1080 # use SOCKS4
#proxySmtp: socks5://127.0.0.1:1080 # use SOCKS5

# Media Proxy
#mediaProxy: https://example.com/proxy

# Proxy remote files (default: false)
#proxyRemoteFiles: true

# Use authorized fetch for outgoing requests
signToActivityPubGet: true

#allowedPrivateNetworks: [
#  '127.0.0.1/32'
#]

# TWA
#twa:
#  nameSpace: android_app
#  packageName: tld.domain.twa
#  sha256CertFingerprints: ['AB:CD:EF']

# Upload or download file size limits (bytes)
#maxFileSize: 262144000

#━━━━━━━━━━━━━━━━━━━━━━━━━━━━━━━━━━━━━━━━━━━━━━━━━━━━━━━━━━━━━━━
# Congrats, you've reached the end of the config file needed for most deployments!
# Enjoy your Firefish server!
#━━━━━━━━━━━━━━━━━━━━━━━━━━━━━━━━━━━━━━━━━━━━━━━━━━━━━━━━━━━━━━━


#━━━━━━━━━━━━━━━━━━━━━━━━━━━━━━━━━━━━━━━━━━━━━━━━━━━━━━━━━━━━━━━
# Managed hosting settings
# >>> NORMAL SELF-HOSTERS, STAY AWAY! <<<
# >>> YOU DON'T NEED THIS! <<<
# Each category is optional, but if each item in each category is mandatory!
# If you mess this up, that's on you, you've been warned...
#━━━━━━━━━━━━━━━━━━━━━━━━━━━━━━━━━━━━━━━━━━━━━━━━━━━━━━━━━━━━━━━

#maxUserSignups: 100
#isManagedHosting: true
#deepl:
#  managed: true
#  authKey: ''
#  isPro: false
#
#email:
#  managed: true
#  address: 'example@email.com'
#  host: 'email.com'
#  port: 587
#  user: 'example@email.com'
#  pass: ''
#  useImplicitSslTls: false
#
#objectStorage:
#  managed: true
#  baseUrl: ''
#  bucket: ''
#  prefix: ''
#  endpoint: ''
#  region: ''
#  accessKey: ''
#  secretKey: ''
#  useSsl: true
#  connnectOverProxy: false
#  setPublicReadOnUpload: true
#  s3ForcePathStyle: true

# !!!!!!!!!!
# >>>>>> AGAIN, NORMAL SELF-HOSTERS, STAY AWAY! <<<<<<
# >>>>>> YOU DON'T NEED THIS, ABOVE SETTINGS ARE FOR MANAGED HOSTING ONLY! <<<<<<
# !!!!!!!!!!

# Seriously. Do NOT fill out the above settings if you're self-hosting.
# They're much better off being set from the control panel.
修改过程中请注意 删除//注释 修改完的配置文件如下图所示

6.3.3 新建docker-compose.yaml文件并编辑
执行以下命令,新建 docker-compose.yaml 文件并编辑
cd .. && nano docker-compose.yaml然后输入以下配置内容,然后 Ctrl X + y +回车 退出并保存即可。
version: "3"

services:
  web:
    image: registry.firefish.dev/firefish/firefish:latest
    container_name: firefish_web
    restart: unless-stopped
    depends_on:
      - db
      - redis
### Uncomment one of the following to use a search engine
      - meilisearch
#     - sonic
    ports:
      - "2087:2087"
    networks:
      - calcnet
#     - web
    environment:
      NODE_ENV: production
    volumes:
      - ./files:/firefish/files
      - ./config:/firefish/.config:ro

  redis:
    restart: unless-stopped
    image: docker.io/redis:7.0-alpine
    container_name: firefish_redis
    networks:
      - calcnet
    volumes:
      - ./redis:/data

  db:
    restart: unless-stopped
    image: docker.io/postgres:14-alpine
    container_name: firefish_db
    networks:
      - calcnet
    environment:
      - POSTGRES_DB=firefish
      - POSTGRES_USER=smalljunsetyourdbusername
      - POSTGRES_PASSWORD=smalljunsetyourdbpassword
    volumes:
      - ./db:/var/lib/postgresql/data

### Only one of the below should be used.
### Meilisearch is better overall, but resource-intensive. Sonic is a very light full text search engine.

  meilisearch:
    container_name: firefish_meilisearch
    image: getmeili/meilisearch:v1.4
    environment:
      - MEILI_ENV=production
      - MEILI_MASTER_KEY=smalljunsetyourapikey
      - MEILI_NO_ANALYTICS=true
#    ports:
#      - "7700:7700"
    networks:
      - calcnet
    volumes:
      - ./meili_data:/meili_data
    restart: unless-stopped

#  sonic:
#    restart: unless-stopped
#    image: docker.io/valeriansaliou/sonic:v1.4.0
#    logging:
#     driver: none
#    networks:
#      - calcnet
#    volumes:
#      - ./sonic:/var/lib/sonic/store
#      - ./sonic/config.cfg:/etc/sonic.cfg

networks:
  calcnet:
  #  web:
  #    external:
  #      name: web
如下图所示

注意:
1.docker-compose.yaml 文件中 2087 为暴露端口,如被占用,请自行更改替换,需要在云服务器的控制台防火墙开放相应端口!
6.3.4 启动容器
输入执行以下命令后台启动容器
docker compose up -d #新版本Docker使用该命令
docker-compose up -d #旧版本Docker使用该命令
如下图所示

启动完后再输入执行以下命令确认所有容器都是 running 或 up 状态
docker compose ps #新版本Docker使用该命令
docker-compose ps #旧版本Docker使用该命令
如下图所示

至此,我们已经安装完成 Firefish ,若你无域名或者不想给程序使用域名,浏览器直接访问 服务器IP:2087 即可访问!

6.4 配置反向代理
先把域名解析到服务器(如果有小白不会解析可以进入 小俊博客的QQ群:199175766 询问,群主就是小俊,一般周末在线,后面考虑写一篇域名解析教程!进入 Nginx Proxy Manager ,点击 Hosts ,然后点击 Add Proxy Host ,按下图进行配置,下图中的 172.17.0.1 可能有所不一,请执行 ip addr 自行查找 docker0 网卡的内网IP!
Domain Names:#填写你想用在该程序的域名
Scheme:默认http #一般不用改
Forward Hostname / IP:172.17.0.1 #一般为 `172.17.0.1` ,可能有所不一,请执行 `ip addr` 自行查找 `docker0` 网卡的内网IP!
Forward Port:2087 #暴露端口(若跟着本文未修改 `yaml` 文件中的暴露端口。应为 `2087` )
如下图所示

先不要着急着点 Save ,大家先去DNS提供商解析域名哦!然后我们可以为程序添加上SSL证书,给他加上一道小绿锁,不过如果你点了也没关系,没点 Save 的朋友点击 SSL ,然后点击 Request a new SSL Certificate ,然后把 Force SSL 和 HTTP/2 Support 打开,修改一下 Email Address for Let’s Encrypt 的邮箱,然后 Save 即可;点击了 Save 的朋友,点击右边的三点,点击 Edit ,重复上述步骤即可!
如下图所示
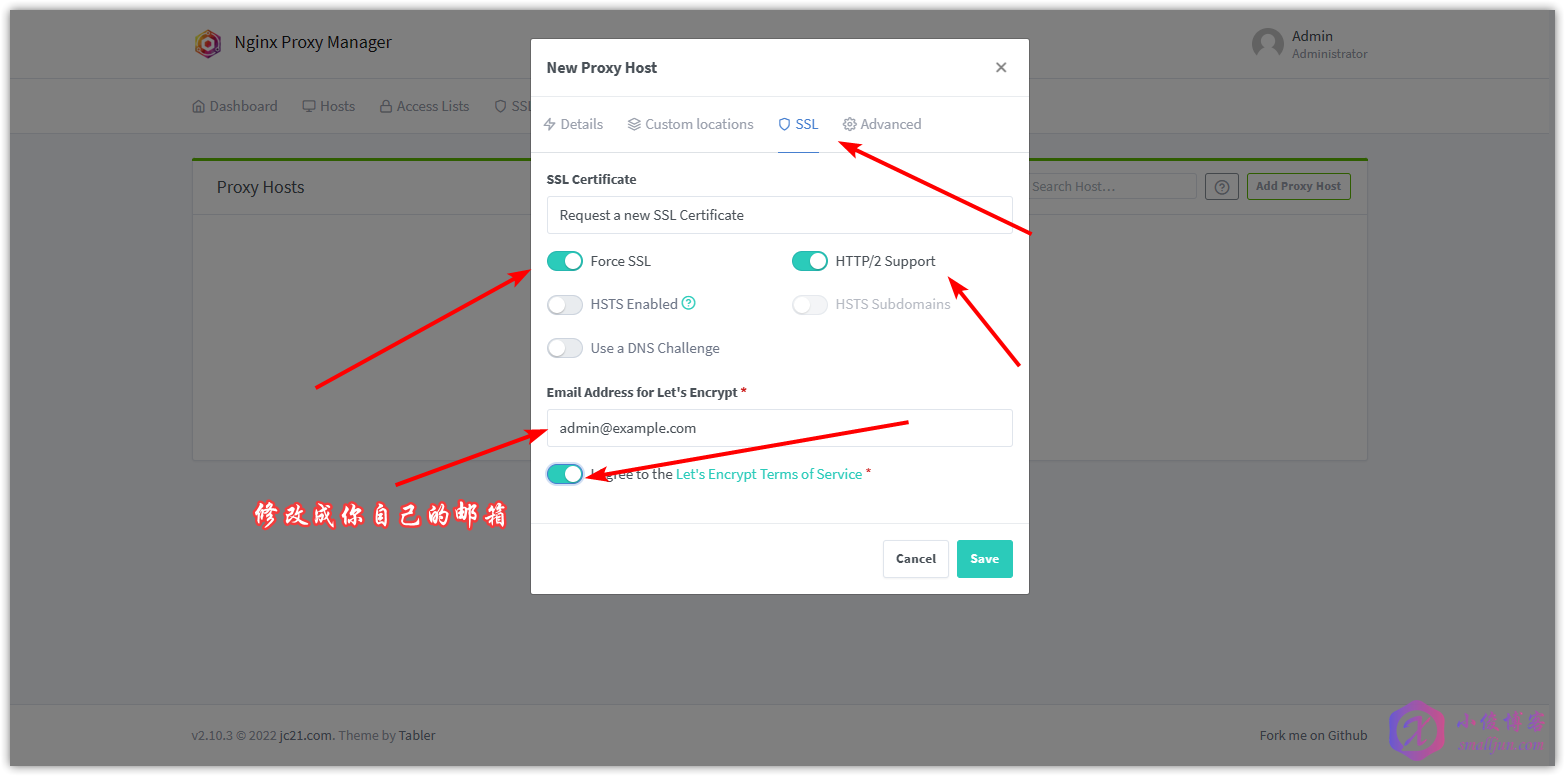
至此,我们已经部署完成 Firefish 了。浏览器访问你刚刚设置的域名即可访问啦,然后创建管理员用户就可以完成全部的安装流程啦!
注意:
- 需要在服务器的后台防火墙开放相应端口!需要开放 80 tcp 、 443 tcp 与 81 tcp 哦,如果你不使用域名访问程序,则只需要开放 2087 tcp 。
7. 简单使用教程
7.1 创建管理员用户
首次打开 Firefish ,需要设置用户名、密码等信息,然后点击 完成 完成注册流程。

7.2 其他
首次进入 Firefish 有官方的简单的教程教你使用,此处不过多赘述,有兴趣的朋友自己摸索一下吧!
8. 目前遇到的问题
8.1 境内服务器难以安装 Docker
建议直接执行以下命令,安装Docker
apt install docker.io然后,参考小俊之前写过的👉👉👉【教程】CentOS系统Docker的详细安装教程https://www.smalljun.com/archives/3174.html ,安装Docker-compose,然后再进行 第6.2步及其后续操作
9. Issues
有问题可以去 Gitlab 看看哦
10. 总结
Firefish 是一款支持导入、简洁清爽UI、良好中文支持等优点的开源、去中心化的社交媒体程序,大家如果发现它别的特点功能可以在评论区踊跃讨论!或者还有什么类似的程序大家也可以评论分享一下!
本文的文章结构部分参考自我不是咕咕鸽,在此感谢我不是咕咕鸽提供的文章结构思路.
我的博客即将同步至腾讯云开发者社区,邀请大家一同入驻:https://cloud.tencent.com/developer/support-plan?invite_code=kgl9gblwtscx





暂无评论内容